What is Hasura.io ?


Fullstack React Native with GraphQL
Building a React Native to-do app in this article will enable us to add tasks, view them, mark or unmark them as complete, and remove them.
In order to create the app, we will use:
1.] React Native
2.] Apollo Client (for client-side GraphQL)
3.] GraphQL engine Hasura (for GraphQL backend)
4.] Auth0 (for auth) (for auth)
NOTE: The new Query and Mutation components that Apollo added in their 2.1.3 version of react-apollo will be used, please note.
-> We may begin with Deploying a GraphQL backend
We need a GraphQL backend where we can store the state of our app. We will be using Hasura cloud to generate an instant GraphQL backend.
Deployment
Deploy Hasura GraphQL Engine by simply clicking on the button below.
Take note of the deployed app's URL. It must take the following format:
auto-generated-string>.hasura.app. Your GraphQL Engine URL is as follows.
Creating the tables
We need to create a table so as to sort the information of the user.

The columns' importance is as follows:
id: Each entry in the users table will be identified by its unique integer id. It serves as the table's main key as well.
Name: The user's name is as follows. This table's data will originate from Auth0.
Note : Auth0 setup and Hasura integration have already been completed and are outside the purview of this guide. To discover how to accomplish it, click here.
We will require a todos table with the following fields to store our to-do lists.
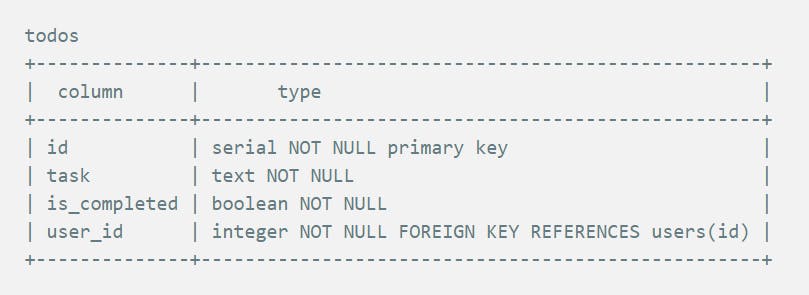
Here is the significance of the columns:
id: This is a unique integer that will identify each todo. It is also the primary key of the table.
text: This is the to-do task.
is_completed: This is a boolean flag that marks the task as completed and pending.
user_id: This is a foreign key referencing
idof theuserstable. It relates the todo to its author.
Let us create the above tables in our backend:
Go to your GraphQL Engine URL in your browser (
https://<auto-generated-string>.hasura.app). It opens up an admin UI where you can manage your backend.Go to the
Datasection on top and click on “Create Table” and add the aforementioned column names and types.
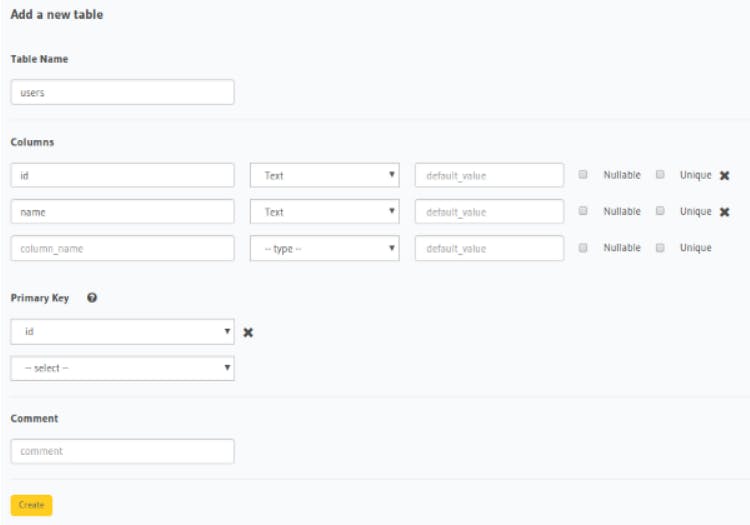
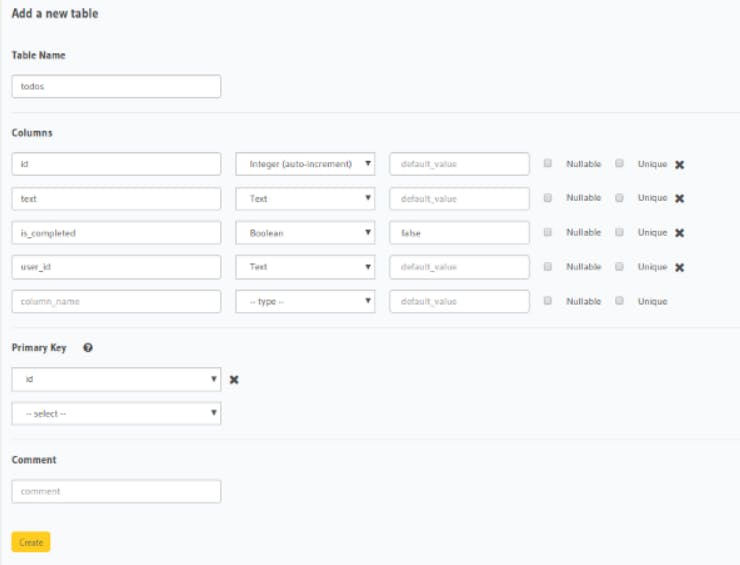
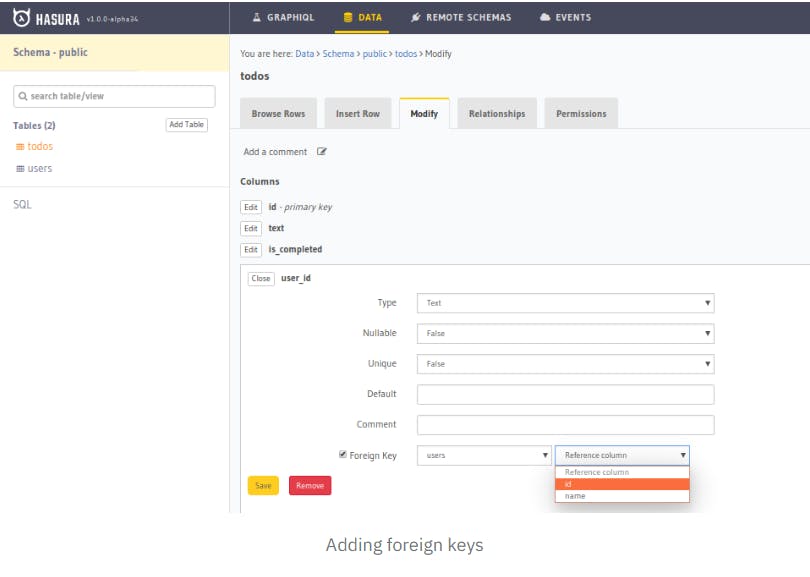
Table relationships
As you see above, there is meant to be a foreign-key-based relationship between todos and users. Let's add the foreign key constraint and the relationship. Go to the data tab on top and click on the todos table. Now, in the modify section, edit the user-id column and make it a foreign key. After this go back to the data tab and click on track all relation.
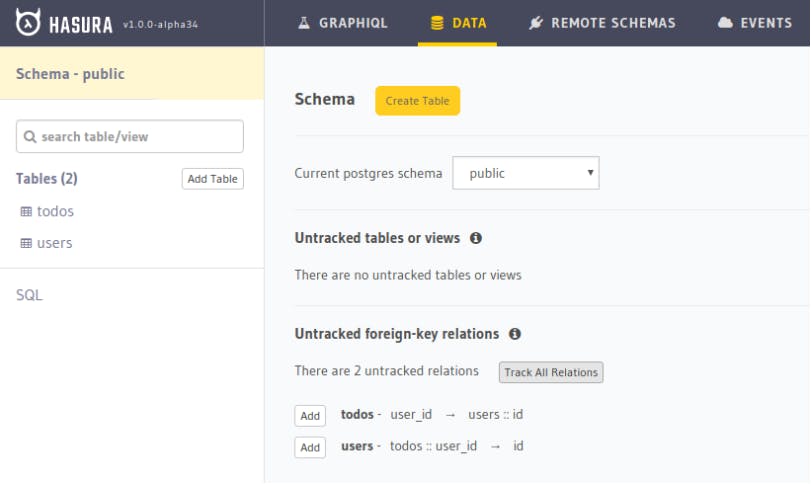
You may create intricate nested GraphQL queries to https://auto-generated-string>.hasura.app/v1/graphql once you have tracked the relationship.
Go to the GraphiQL tab in the console and try running a query to test it out.
Table access rights
We only want users to CRUD their own to-dos in our to-dos table. Hasura offers an access control layer that allows for the configuration of rules to limit data to particular roles. There is only one user role in this app. Let's give it permissions.
Go to your Hasura console's /data/schema/public/tables/user/permissions, add the role user, and only permit CRUD in the user table when x-hasura-user-id equals id. By checking that the X-Hasura-User-Id from the JWT in the header is equal to the id of the user that they are CRUDing over, Hasura will make sure that a user may only CRUD when doing so.
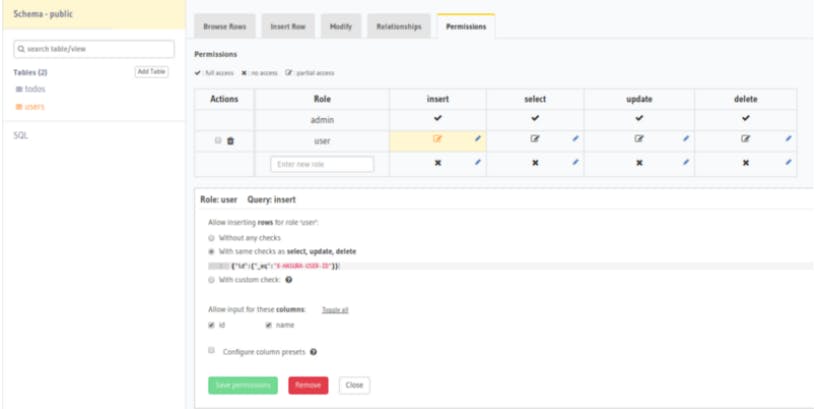
The above screenshot shows the permission condition for inserting query, adding similar permissions for selecting, updating and deleting queries.
Similarly, add permissions for the todos table with the condition: { 'user_id': 'X-Hasura-User-Id' } . This means that a user can CRUD only their todos.
With this, we have set up our backend. Let us work on React Native now.
Part 2: Setup React Native Project
We will be using Expo for this tutorial. Get started with a boilerplate project by running:
npm install -g expo-cli
expo init Todo
cd Todo
npm start
This will create an empty React Native project where App.js is the entry point. This App.js must maintain a state called isLoggedIn which if false, should render the Auth screen, else render the app (currently just Hello world). It should also pass login and logout functions as props to the AuthScreen and the app respectively. The App.js should currently look something like:
Part 3: Setup Auth
Since we are using JWT, install the package jwt-decode from npm.
npm install --save jwt-decode
Create a directory called src at the top level and create another subdirectory in it called auth. Inside auth , create a file called Auth.js and perform authentication with auth0 using Expo’s AuthSession. The Auth0.js should look something like this.
Configuring Apollo Client
Firstly, let us install the dependencies related to Apollo client. Run the following command from the todo-app directory.
$ npm install apollo-boost react-apollo graphql-tag graphql --save
Create a file called apollo.js and export a function that accepts a token and returns an instance of Apollo Client. You have to configure the Apollo client with the GraphQL endpoint and the token. (Replace with your GraphQL endpoint).
Now create a directory in the src folder called app and create a file called Main.js. This will be the entry point of your todo app where you instantiate the Apollo client using the above function and provide it to the children components using ApolloProvider. The child component currently is just TodoList. We will write this component in the next section.
Before that, we have to insert the user that logged in into the users table with an insert_mutation using the client. We can do it in the componentDidMount of this component itself before setting the client in state.
CONCLUSION
The following were discussed in this blog article.
- deployed the Hasura GraphQL Engine as a GraphQL server.
- configure the tables and permissions
Created a React Native app and used Auth0 for authentication.
Create an Apollo client with a JWT and GraphQL endpoint.